Image Processing API
This project aims to give you a real-world scenario in which you would read and write to your disk via a Node.js express server rather than a database. The project you create serves two purposes: to prepare you for setting up scalable code and architecture for real-world projects and tie together some of the most popular middleware and utilities found in Node.js projects. This project barely touches the surface of what is possible but will prove your ability to use what you’ve learned in real-world scenarios.
For this project, refactor and test as much as possible while you are building. Since you are using TypeScript and an unfamiliar library, it is sometimes easier to write and build in plain JS to see what your functions return; remember your submission needs to be in TypeScript. As your skills improve, typing in TypeScript will feel more intuitive. Make sure to remove any debugging code from your final submission.
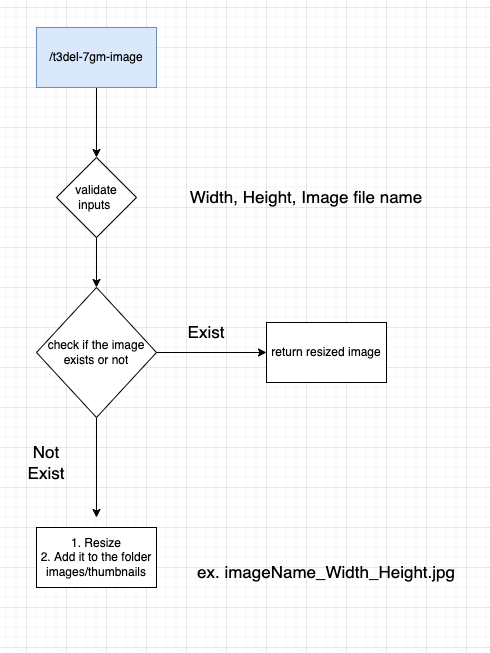
here's small digram for what's needed to be done
Getting Started
Usually, you would get some starter code to build from, but with this project, it’s your job to prove you can do it from scratch, so all that is being provided for you is a folder of license-free stock images you are welcome to use. If you would like to use your own images for this project, you are welcome to do so, but whoever reviews your project will see your images, and when you display your project online, viewers will also see them.
You can use your own images or use the ones provided in this repo: images
Instructions
Feel free to attempt to create this project based on the overview and rubric specifications. If you get stuck or prefer structured guidance -- here is a walkthrough to get you up and running!
Initialize your project
Add the dependencies required for this project, including Express, TypeScript, Jasmine, Eslint, and Prettier. Complete your package.json file.
this can be done manually or by using my lovely tool m-zanaty-web-utils to install all you need in 1-2 seconds based or internet speed but for here I will go with the manual solution but if you don't have time to waste here's a video to explain how to use my magic tool
Before start
Let's start by checking if node is currently installed
node -v
if nothing show up in your termainl please download and install node in your machine
If you already have Node.js on your machine, it's a good idea to reinstall it to make sure you have the latest version.
Keep in mind that Node.js now comes with
npmby default.
MacOS
- Install Homebrew by
running
/usr/bin/ruby -e "$(curl -fsSL https://raw.githubusercontent.com/Homebrew/install/master/install)"in the terminal. - Check that it was installed by running
brew --version. You should see the version number that was installed. - Run
brew install node. - Run
node --version. - Check that
npmwas installed as well by runningnpm --version. - Run
brew install yarn. - Run
npm --version. - Run
yarn install && yarn --version
Windows
- Please download the Node.js Installer, go through the installation process, and restart your computer once you're done.
- Please follow the
yarninstallation instructions. - Run
yarn --versionto make sureyarnhas been successfully installed.
Linux
- Please follow these instructions to install Node.js.
- Run
sudo apt-get install -y build-essential. - Please follow the
yarninstallation instructions. - Run
yarn --versionto make sureyarnhas been successfully installed.
TypeScript with NodeJS
Create a new emplty folder and in the root project folder run the following commands to create package.json
npm init -y# or using yarnyarn init -y
you can open your terminal and install typescript globally in your machine via
npm install -g typescript
and you will be able to find it's version via tsc --version but as mention in official website for
typescript
Having TypeScript set up on a per-project basis lets you have many projects with many different versions of TypeScript, this keeps each project working consistently.
so now we will install it via npm TypeScript is available as a package on the npm registry available as typescript.
You will need a copy of Node.js as an environment to run the package. Then you use a dependency manager like npm, yarn to download TypeScript into your project.
npm install typescript --save-dev# oryarn add typescript --dev
TSC && tsconfig.json
Typically the first step in any new TypeScript project is to add a tsconfig.json file. A tsconfig.json file defines the TypeScript project settings, such as the compiler options and the files that should be included.
To do this, open up the folder where you want to store your source and add
Init config typescript via
tsc --init
Note: in last command I assume to install the typescript globally otherwise it will raise issue with the package not found or whatever it's in this case u need to try to run it as
./node_modules/.bin/tsc --init
you will notice now that a new .tsconfig file created for you which contain all the needed configuration for you so we will changed it a little bit to match the criteria we need not so much update i belive we just need to define the something like
// .tsconfig{"compilerOptions": {"target": "es5","module": "commonjs","lib": ["ES6", "DOM"],"outDir": "./dist","rootDir": "./src","strict": true,"noImplicitAny": true,"esModuleInterop": true,"skipLibCheck": true,"forceConsistentCasingInFileNames": true},"include": ["./src"],"exclude": ["node_modules", "spec", "build"]}
Now when you create a .ts file as part of the project we will offer up rich editing experiences and syntax validation.
Let's walk through transpiling a simple TypeScript Hello World program.
1- Create a index.ts file, place the following code in that file...
let message: string = 'Hello World';console.log(message);
open a terminal and type tsc index.ts. You should now see the transpiled index.js JavaScript file, which you can run if you have Node.js installed, by typing node index.js.
Folder Structure
let's add a src folder which will contain all of the typescript files and make it as Root Directory in tsconfig.json file When TypeScript compiles files, it keeps the same directory structure in the output directory as exists in the input directory.
For example, let’s say you have some input files:
MyProj
├── tsconfig.json
├── src
│ ├── a.ts
│ ├── b.ts
│ ├── sub
│ │ ├── c.ts
├── types.d.ts
The inferred value for rootDir is the longest common path of all non-declaration input files, which in this case is src/.
If your outDir was dist, TypeScript would write this tree:
MyProj
├── dist
│ ├── a.js
│ ├── b.js
│ ├── sub
│ │ ├── c.js
🔗 Read more from documentation
So basically what are we needing? We need to install express and install @types package linked to the previous package. We also need to install ts-node in order to build typescript file in nodejs. also we need logging pacakge like morgan with its @types and package for handing environment variables like dotenv
So let's do this
npm install express morgan dotenv# andnpm install --save-dev @types/express @types/morgan @types/node nodemon ts-node nodemon
Now, typescript and express is setup lets add the script to the package.json file:
// package.json// ..."scripts": {"start": "nodemon --watch './**/*.ts' --exec 'ts-node' ./src/index.ts","build": "npx tsc","start:prod": "npm run build && node dist/index.js",}
now it's time to create .env in the root directory with the environment variables needed for the sake of sample now let's put PORT=3000 and configure it in the index.ts for example let's start with
import express, { Application, Request, Response } from 'express'import morgan from 'morgan'+ import * as dotenv from 'dotenv'+ dotenv.config()const PORT = process.env.PORT || 3000// create an instance serverconst app: Application = express()// HTTP request logger middlewareapp.use(morgan('dev'))// add routing for / pathapp.get('/', (req: Request, res: Response) => {res.json({message: 'Hello World 🌍'})})// start express serverapp.listen(PORT, () => {console.log(`Server is starting at prot:${PORT}`)})export default app
u can open your terminal now and run npm run start and u will see u have a running server on port 3000 so it's time to open your browser and run http://localhost:3000/ and u will get json object with Hello World 🌍 message
Now I assume everything sound cools let's install more intersting tools to make things more cooler
Install Prettier
run the follwing command to install pretteir package
npm install --save-dev --save-exact prettier# or using yarnyarn add --dev --exact prettier
Then, create an empty config file to let editors and other tools know you are using Prettier:
echo {}> .prettierrc.json
This lets everyone know this is a Prettier project that uses the default configuration. You can put other configs here if you hold strong formatting opinions. for example here's mine
{"singleQuote": true,"printWidth": 80,"bracketSpacing": true,"semi": false}
Next, create a .prettierignore file to let the Prettier CLI and editors know which files to not format. Here’s an example:
# Ignore artifacts:builddistnode_modules
Install Eslint
Create .eslintrc.js by running
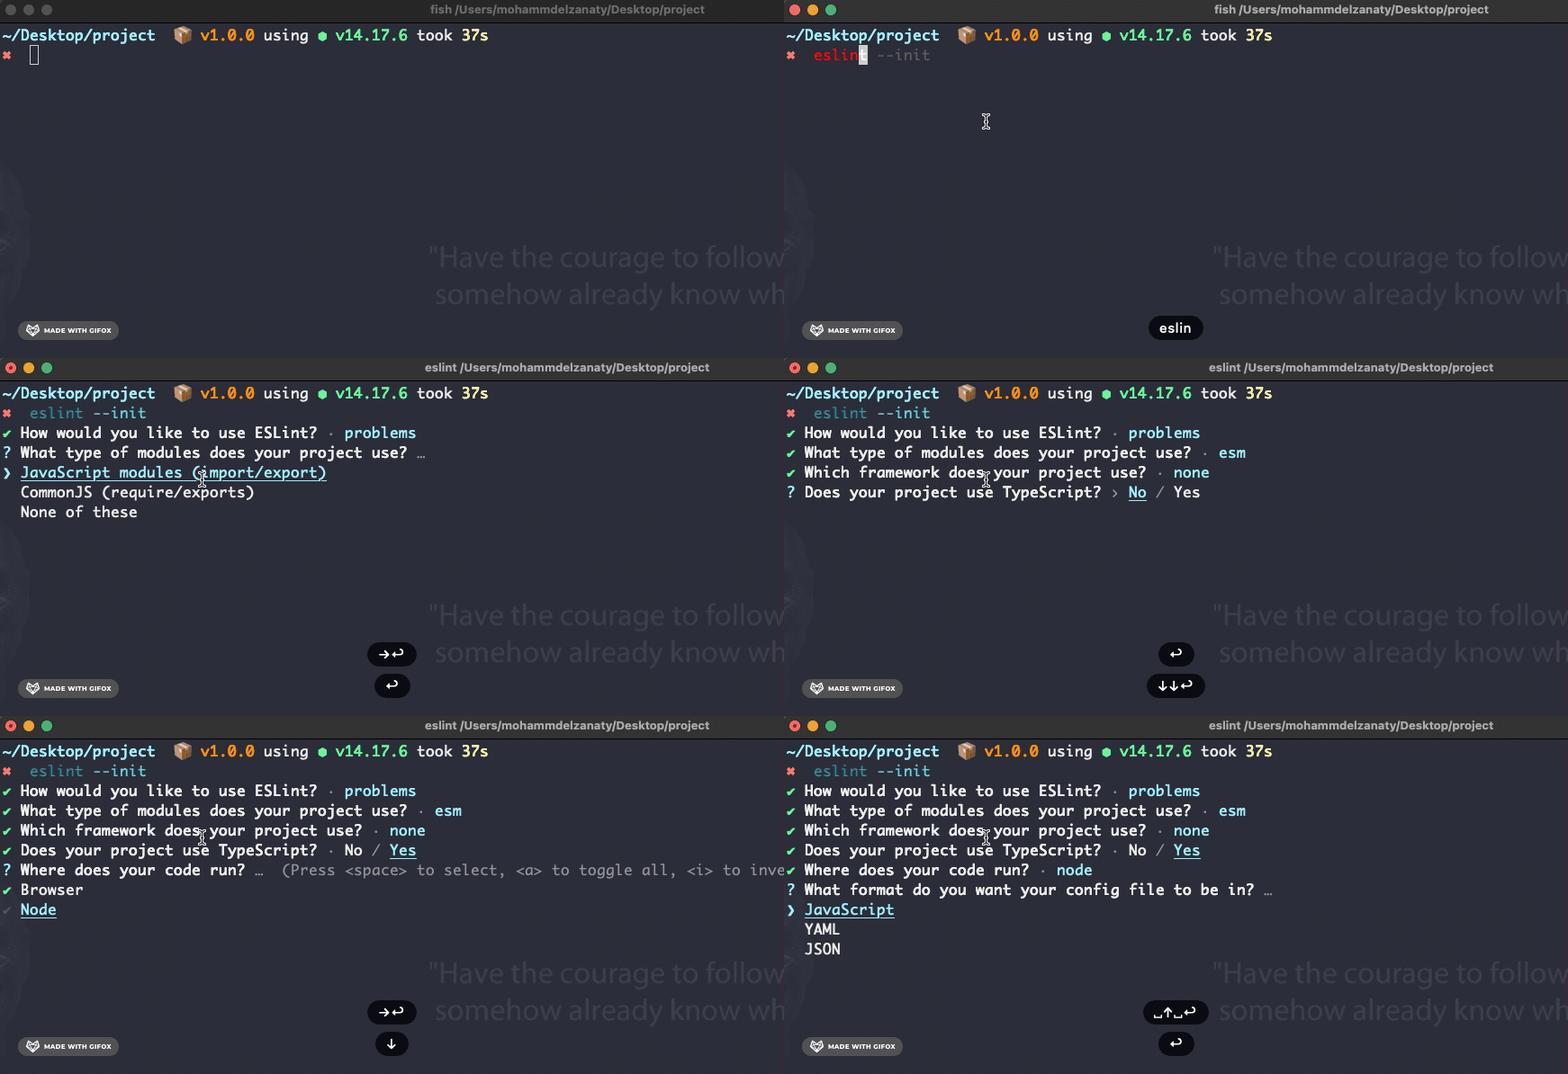
npx eslint --init# oryarn run eslint --init
 Now you will notice that there's a new file created in your folder named
 .eslintrc.js with the following content
module.exports = {env: {es2021: true,node: true},extends: ['eslint:recommended', 'plugin:@typescript-eslint/recommended'],parser: '@typescript-eslint/parser',parserOptions: {ecmaVersion: 13,sourceType: 'module'},plugins: ['@typescript-eslint'],rules: {}}
and the needed packages @typescript-eslint/eslint-plugin, @typescript-eslint/parser added to the devDependencies in the package.json
Eslint + Prettier Integration
In this step we need to configure eslint with pretter together so that they don't collide with each other and this will happen by
npm install eslint-config-prettier eslint-plugin-prettier --save-dev# or using yarnyarn add eslint-config-prettier eslint-plugin-prettier prettier --dev
Please check each of their git repositories. eslint-config-prettier - Turns off all rules that are unnecessary or might conflict with Prettier.
eslint-plugin-prettier - Runs Prettier as an ESLint rule
After installing above, make changes to .eslintrc.js file.
module.exports = {env: {es2021: true,node: true},+ extends: ['eslint:recommended', 'plugin:@typescript-eslint/recommended', 'prettier'],parser: '@typescript-eslint/parser',parserOptions: {ecmaVersion: 13,sourceType: 'module'},+ plugins: ['@typescript-eslint', 'prettier'],rules: {+ 'prettier/prettier': 2, // Means error}}
if we might need to add some rules to eslint to make our code follow it and this can be done by adding to the rules object in .eslintrc.js file as follow for example
module.exports = {// ....rules: {semi: ['error', 'never'],quotes: ['error', 'single'],'prettier/prettier': 2, // Means error'no-console': 1, // Means warning'no-var': 'error','prefer-const': 'error'}}
ESLint Rules - https://eslint.org/docs/rules/
Now, eslint and prettier is setup lets add the script to the package.json file:
// package.json"scripts": {"lint": "eslint .","lint:fix": "eslint --fix","format": "prettier --write 'src/**/*.ts'"}
Install ESLint & Prettier extensions for VSCode and Optional - Set format on save and any global prettier options
Install Jasmine
Please read Documnetaion it show clearly what the needed steps to install jasmine with javascrpt and for our project
- Install the needed dependencies supertest, jasmine-spec-reporter, jasmine
npm install supertest jasmine-spec-reporter jasmine
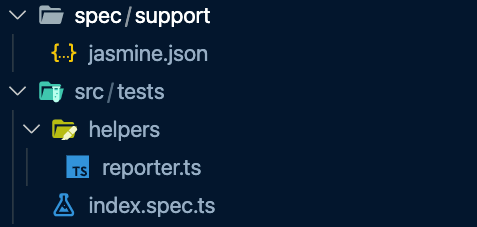
- Create the needed folder at the image below
- Fill
jasmine.jsonandreporter.tswith the needed configureation and feel free to play with these files
// jasmine.json{+ "spec_dir": "dist/tests", // this will be the folder which contain the output js code"spec_files": ["**/*.spec.js"],"helpers": ["helpers/**/*.js"],"stopSpecOnExpectationFailure": false,"random": false}
// reporter.tsimport { DisplayProcessor, SpecReporter, StacktraceOption } from 'jasmine-spec-reporter'import SuiteInfo = jasmine.SuiteInfoclass CustomProcessor extends DisplayProcessor {public displayJasmineStarted(info: SuiteInfo, log: string): string {return `${log}`}}jasmine.getEnv().clearReporters()jasmine.getEnv().addReporter(new SpecReporter({spec: {displayStacktrace: StacktraceOption.NONE},customProcessors: [CustomProcessor]}) as CustomReporter)
Now, jasmine is setup lets add the script to the package.json file to be able to run test cases:
// package.json"scripts": {"test": "npx tsc && jasmine",}
That's it. what a journey imagine you save all the time your read these steps and used my lovely tool m-zanaty-web-utils to install all you need in 1-2 seconds
Don't be sad my firend now u know what's happening behind the scence which is important
Set up your project structure
Create folders and files for what you anticipate you will need for the project.
- How do you plan to keep your source code and build code separately?
- Where will you keep your tests?
- How do you plan to name your routes? Utilities?
Configure your middleware and dependencies
You have quite a few dependencies that all need to work together. Sometimes it's easiest to write some simple js functions to test that all of your dependencies work together before you begin adding any functionality.
- Does your TypeScript compile?
- Do your Eslint and Prettier scripts work?
- Are you able to write and pass
Create an API endpoint
Even though this application is fairly straightforward, you still want to set it up in a scalable way. How can you set up your server and route so that your project remains scalable? Only one endpoint is required. It's best to create this and test that it is working before you move on.
Install Sharp and configure endpoint
Create a separate module for your processing functionality and import it into your route. You are only required to add resizing, but you may add additional processing if you choose to extend your application. You are only required to work with jpg files, so keep that in mind if you choose to use your own images and they are other formats.
- Pay close attention to if you need to use asynchronous code or not. If you do, make sure you stay consistent throughout your application.
- There is limited information on using Sharp with TypeScript, but don't let that be a blocker. Think about what type the Sharp constructor would return. Have a look at the Sharp Constructor documentation and the examples it provides.
Write your tests
If you haven't already been writing unit tests, now would be the time to start. Think about what you should test? At a minimum, you should have at least one test for your endpoint and at least one test for your image processing, but there are many different tests you could create.
Add caching
Add caching to your application so that repeated requests to your endpoint use pre-stored images rather than regenerating a new image each time.
Test, Debug, and Refactor
Think of edge-cases for your project and how someone may access your project. Should they get different error messages based on what's wrong? Make certain that your user isn't left in the dark when something goes wrong.
- Do all of your tests still pass?
- Does stopping and restarting your server cause any issues?
- Does your user get feedback when something goes wrong?
- Is your code easy to follow? Comments?
- Is your API production-ready?
Build, Document, and Submit
If everything else has gone well, you should be able to compile your typescript and start up your production server to test that everything still works as expected. Make sure you've provided all necessary information in your readme file, so your reviewer knows how to test your API. If everything works and your documentation is complete, you're ready to submit! Congratulations!
Version Control
Although not a requirement, we recommend using Git from the very beginning if you choose to build on your local environment or use the provided workspace. Make sure to commit often and to use well-formatted commit messages.
Udacity Style Guides
Although Eslint and Prettier will handle most of your formatting needs, you should write your code and markup to meet the specifications provided in these style guides:
A note on plagiarism: Viewing someone else’s code to get a general idea of implementation, then putting it away and starting to write your own code from scratch is okay. Please do not copy someone's code, in whole or in part. For further details, check out this guide regarding plagiarism.
Most of the text here provided by 🎭 © Udacity and I am only adding a little bit chooclate to make it more tasty and powerfull


